

Want that edge-to-edge even doneness on your next steak topped with decadent compound herb butter, but just not sure how to achieve it without a grill? Maybe you don’t own a grill, or your grill is buried under three feet of snow.
Well, you’ve come to the right place. Here, I’ll show you step-by-step how to get a steakhouse-quality steak without ever leaving your kitchen. Add to that, I’ll give you five reverse-sear tips for success.
In fact, I’m going to go so far as to say that by following this guide, you’ll turn out a better than steakhouse-quality steak. Steakhouses, for the most part, cook steaks using an incredibly high heat broiler, sometimes called a salamander.
While the high temperature broiler is a great method for thinner cuts of steak—more on that later—it’s not great for thinner cuts.
I’m a big fan of reverse searing, using my grill. Bringing the same concept indoors, I’m showing you how to make use of the oven and a cast iron skillet to simulate as closely as possible the outdoor grilling experience.
I recognize not everyone has access to a grill. However, anyone with an oven and a cast iron skillet can reverse sear steak. Cooking steak in an oven requires time, but it’s easier than you think to get great results.
What Is a Reverse Sear?
You may have heard in the past that you should sear a steak first, to “lock in the juices” and then let it come up to temperature slowly. Under the right circumstances and with the right equipment, that method is effective.
That said, most people don’t have the equipment needed to sear fast and hot enough to make this method work well.
The reverse-sear method, quite simply, is the reverse of searing a steak first. Instead, reverse searing meat is the method of bringing the temperature of the meat up slowly and evenly in a low-temperature environment, around 225 °F.
Then, after a short rest, introduce the meat to very high direct heat to create the Maillard reaction that’s responsible for the charred crust that’s oh so delicious.
How Hot Should a Cast Iron Skillet Be for Searing Steaks?
You’re looking for at least 500 °F, but preferably 650-700 °F if you can get there. Don’t worry about the pan. Quality cast iron can stand up to those temperatures without risk of material failure.
What Are the Benefits of Using the Reverse-Sear Method?
For an in-depth look, check out my blog on the benefits of reverse searing. It’s very informative, if I say so myself. In short, this method serves two distinct purposes.
First, it’s a foolproof way to achieve that perfect coast-to-coast doneness without overcooking the outside of the meat.
Second, you get to eat a piping hot steak because you don’t need to rest the steak at the end of the cook like you do when using other cooking methods.
Should All Steaks Be Cooked Using Reverse Sear?
NO! I love this method of cooking, but it’s best served for cuts of meat that are at least 1.5 inches thick.
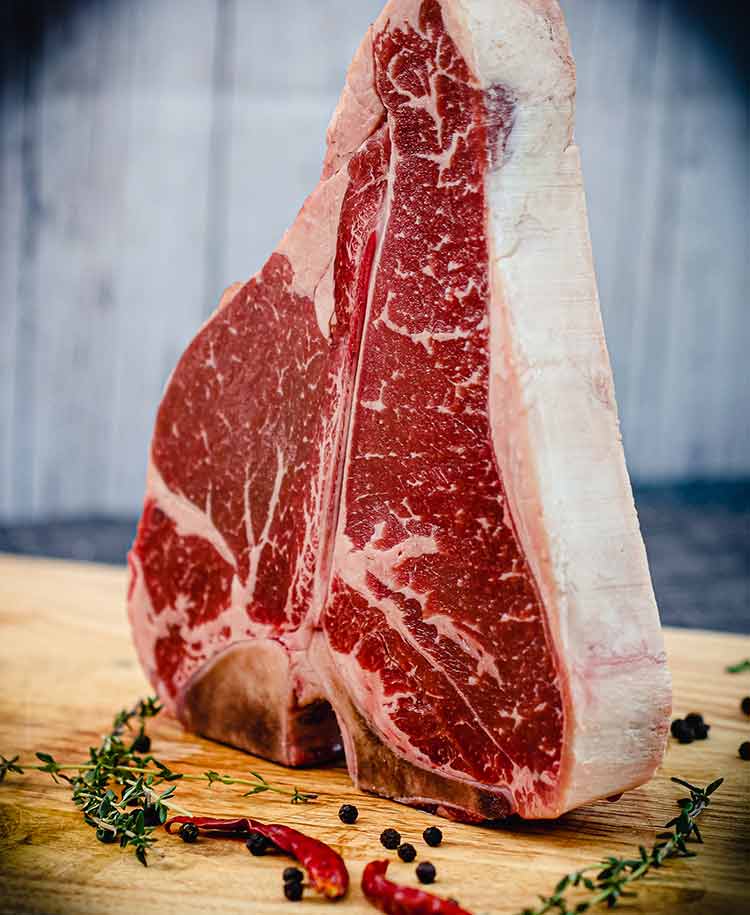
While this post features a massive tomahawk steak, reverse searing is ideal for any thick cut of meat. Like this giant porterhouse for two for example.
Another great use of this technique is for roasts. Like this prime rib, for example, and all of them can be done using the techniques I’m sharing here using an oven and a cast iron skillet.
The reverse-sear method is also highly effective for cuts like filet mignon. The filet is a notoriously difficult cut of meat to cook perfectly, based on its shape and thickness.
If I’m cooking a steak cut to a more standard thickness, or any piece of meat that’s cut to less than 1.5 inches thick, I don’t use the reverse-sear method. For the thicker cuts of steak though, or even these thick cut maple-glazed pork chops—the reverse-sear method is highly encouraged.
5 Tips For Reverse Searing Using a Cast Iron Skillet And Oven
The Skillet: It’s a myth that cast iron heats evenly. In fact, it’s just the opposite. Cast iron heats extremely unevenly so, to ensure as even as possible heating, place the cast iron pan in the oven with the steak and allow it to preheat before putting it on the burner.
The Exhaust: The downside to this method is the smoke created from cooking at such high temperatures. Before you start searing, open the windows and crank the exhaust fan above your range. Or be prepared for your smoke alarm to start screaming at you.
The Lip: If you’re using a smaller cast iron skillet, be conscious that the bone of a large steak like a tomahawk is going to hang over the raised edge of the skillet. This may prevent some surface area of the steak from contacting the pan. If you have a cast iron griddle, that works well for the giant bone-in steaks.
The Flip: Cast iron cools quickly when a cool, or even warm food is placed on its surface. So, when flipping the steak, don’t flip it directly onto the same spot in the skillet. Instead, always place it in a new spot in the skillet that will be much hotter.
The Fat: Because we are searing at such high temperatures, don’t use a low smoke point oil like olive oil in the skillet. Instead, use beef fat trimmed from the steak. It provides great flavor and has a much higher smoke point than olive oil.
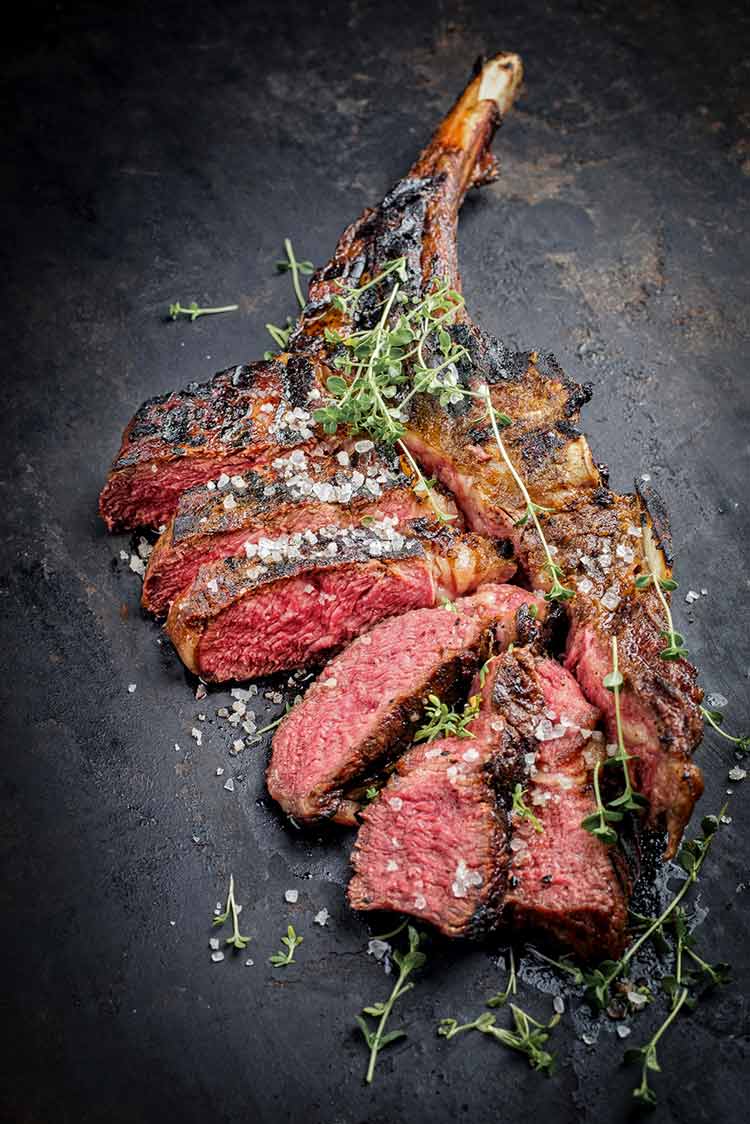
OK, enough talk. Whatdoya say we get to this tomahawk?
Reverse-Seared Tomahawk Steak Recipe
Serves: 2 | Prep time: 10 minutes | Cook Time: 70 minutes
Ingredients
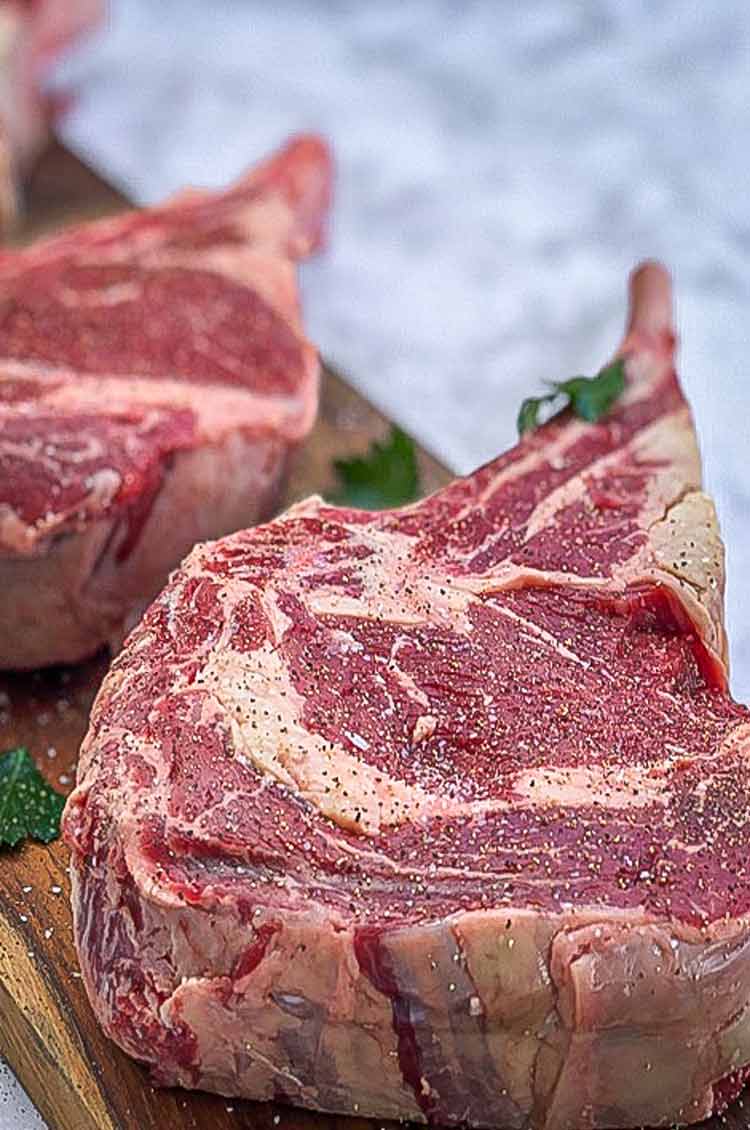
1 tomahawk ribeye steak
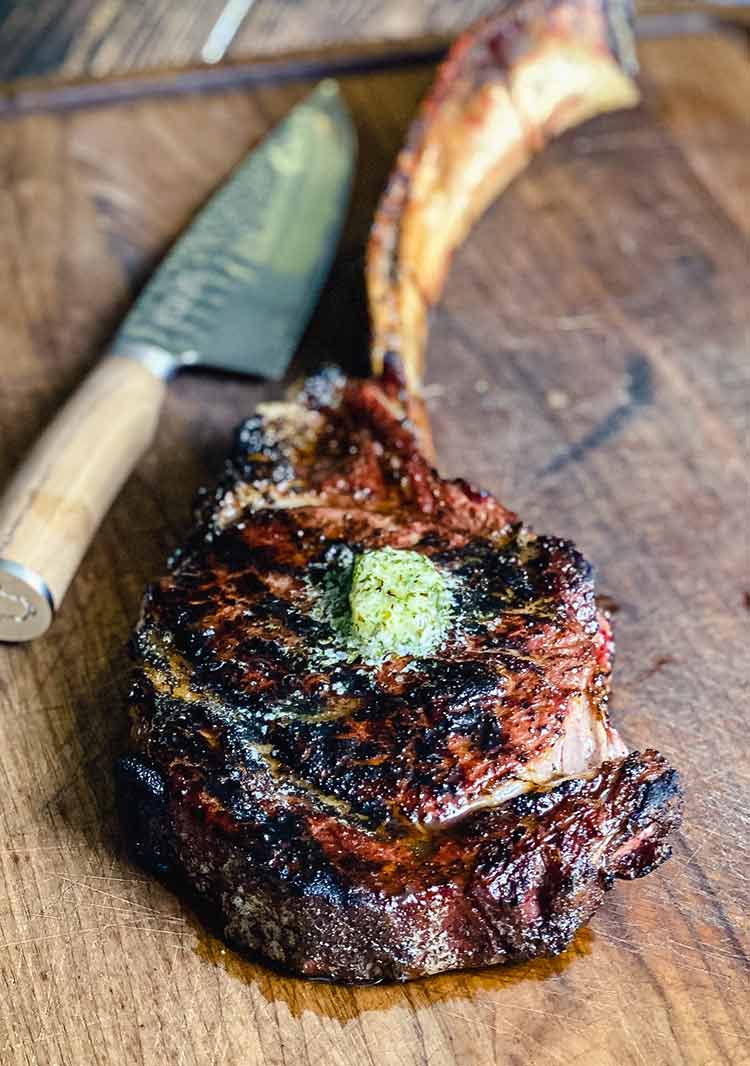
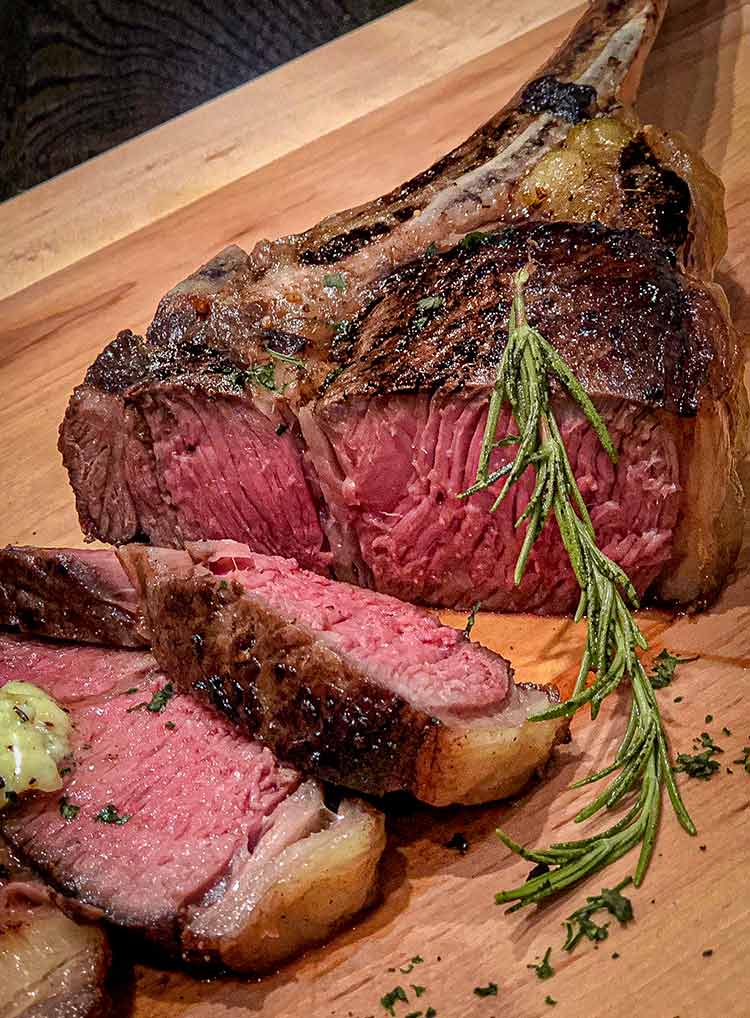
2 tbsp compound herb butter
1–2 sprigs fresh rosemary
Salt and pepper to taste (or your favorite steak rub)
How To Reverse Sear a Tomahawk Steak in an Oven and Cast Iron Skillet
Step 1: Remove your steak or steaks from the refrigerator and allow it to warm up slightly to room temperature for about an hour. Starting with a steak that is closer to room temperature helps with the even doneness we’re striving for.
While the steak is warming up, cut just a sliver of the fat from around the edge of the steak and place it back in the refrigerator. We’ll use that later.
Step 2: Season liberally with kosher salt and pepper, or your favorite steak rub. Insert a reliable leave-in thermometer into the thickest portion of the steak.
Step 3: Place the cast iron pan in the oven and preheat the oven to 225° F.
Step 4: Place steak on a cooling rack, and place the rack in a baking sheet. I cover the baking sheet with foil just to cut down on the cleanup later.
Step 5: Place the steak in the oven until it reaches an internal temperature of 122 °F; about 45 minutes, depending on the size of the steak. (This is the timing for medium rare; cook to your desired temperature.)
Step 6: Remove the steak from the oven and let it rest while continually monitoring the internal temperature on the leave-in thermometer. Temperature should peak at around 129–130 °F (usually about 7–8 minutes).
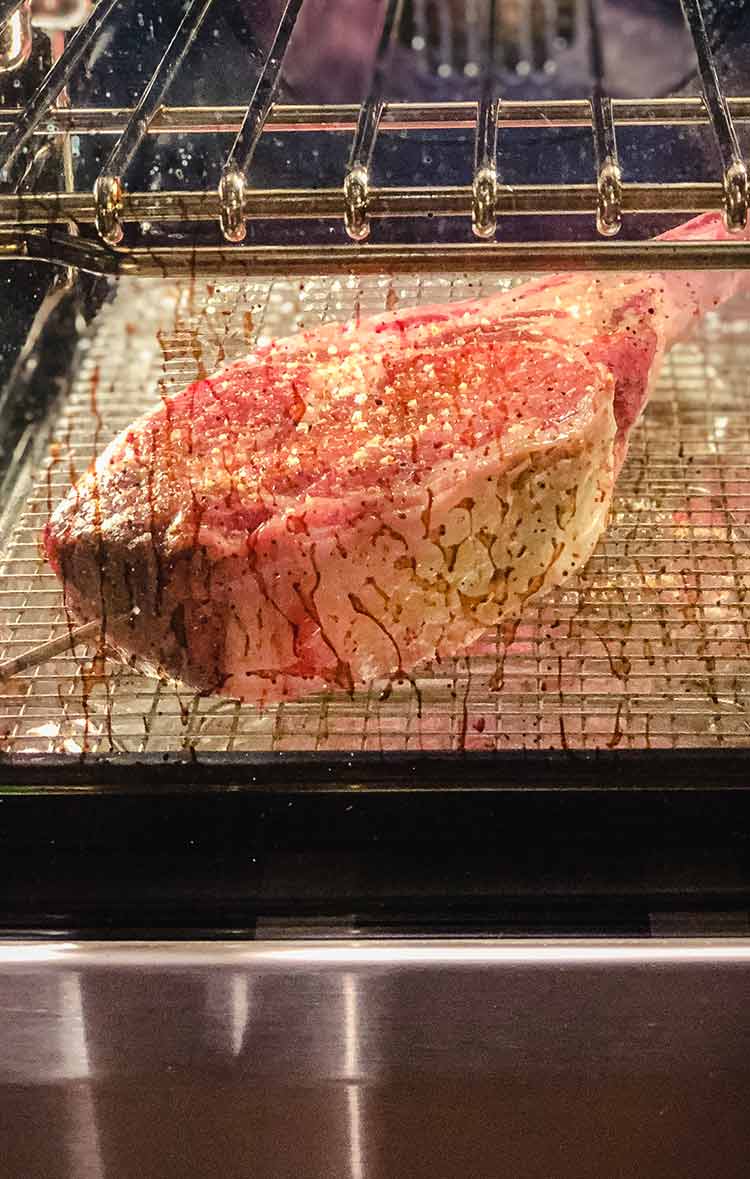
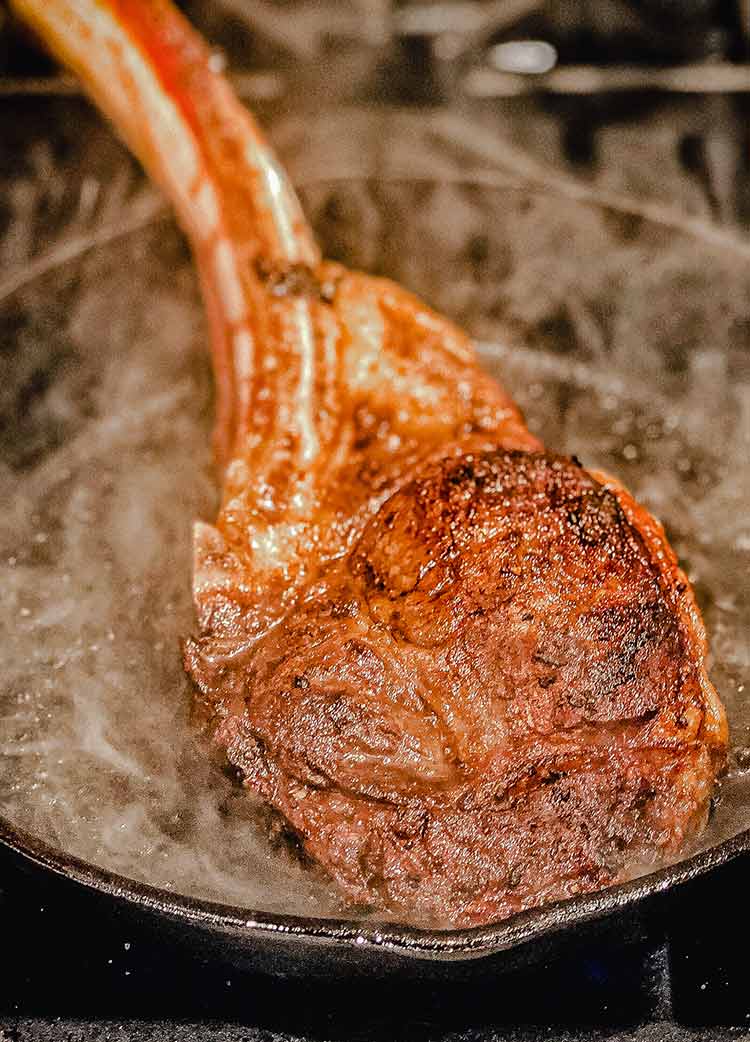
Step 7: While the steak is resting, place the preheated cast iron pan over medium-high heat on the stove. Then, place that sliver of fat we removed earlier into the pan and allow it to render down. This is what we are going to sear the steak in.
Once the steak’s internal temperature has peaked and starts decreasing, add a sprig of rosemary to the rendered beef fat, and crank the heat under the cast iron pan to max for one to two minutes.
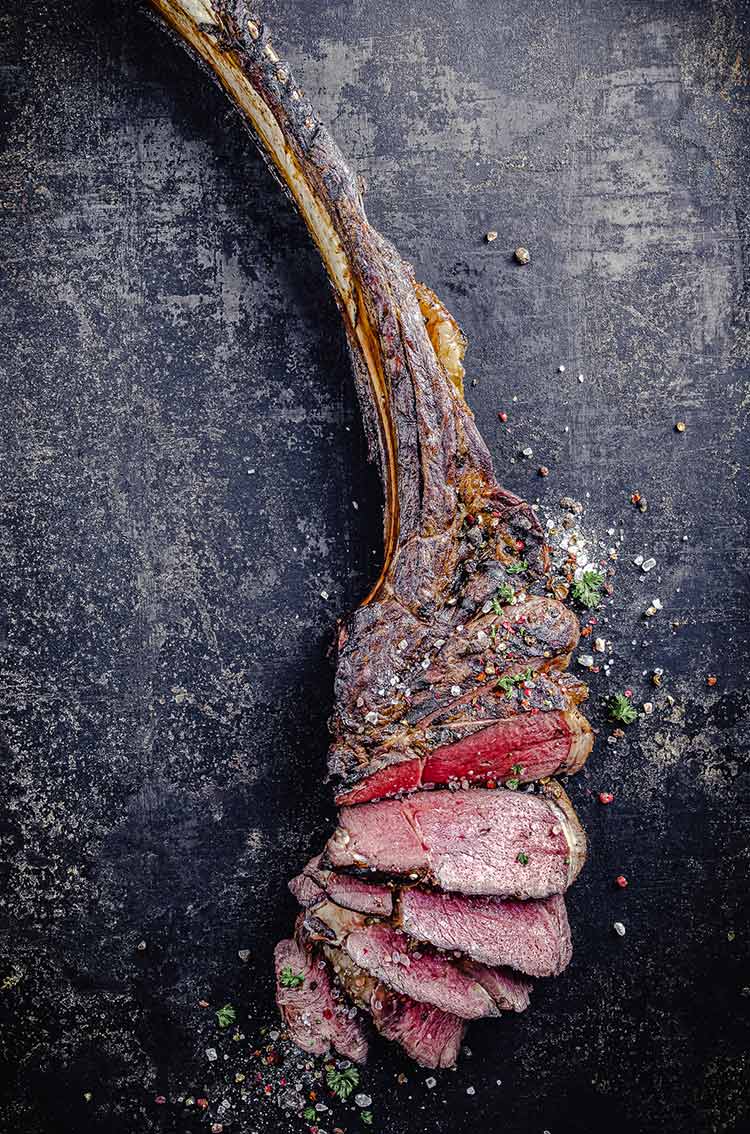
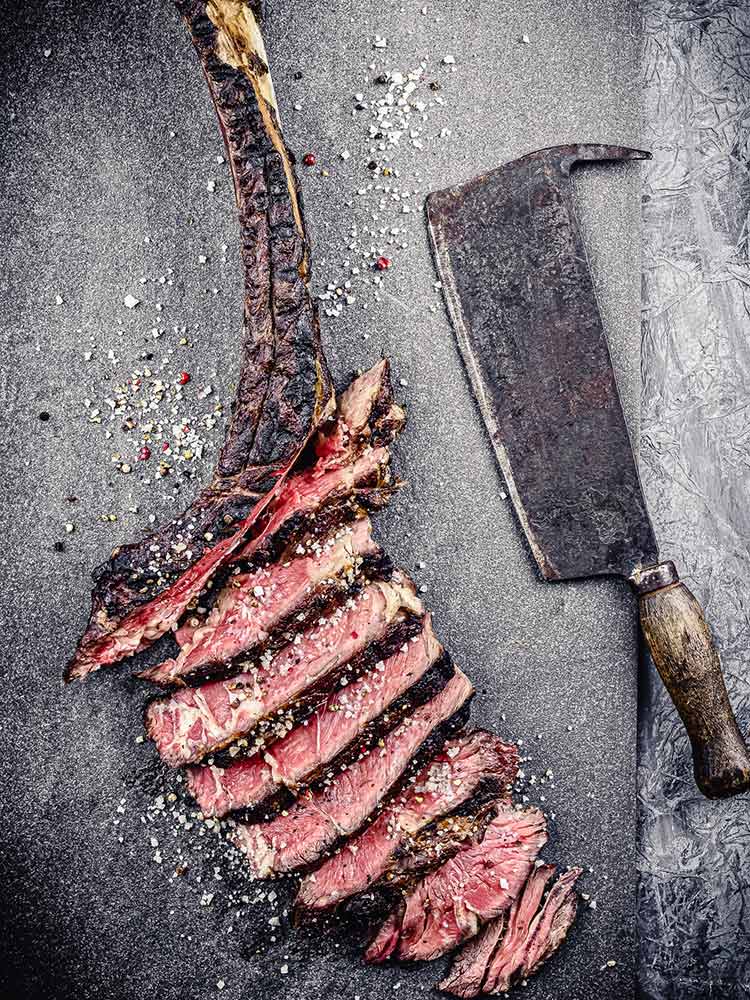
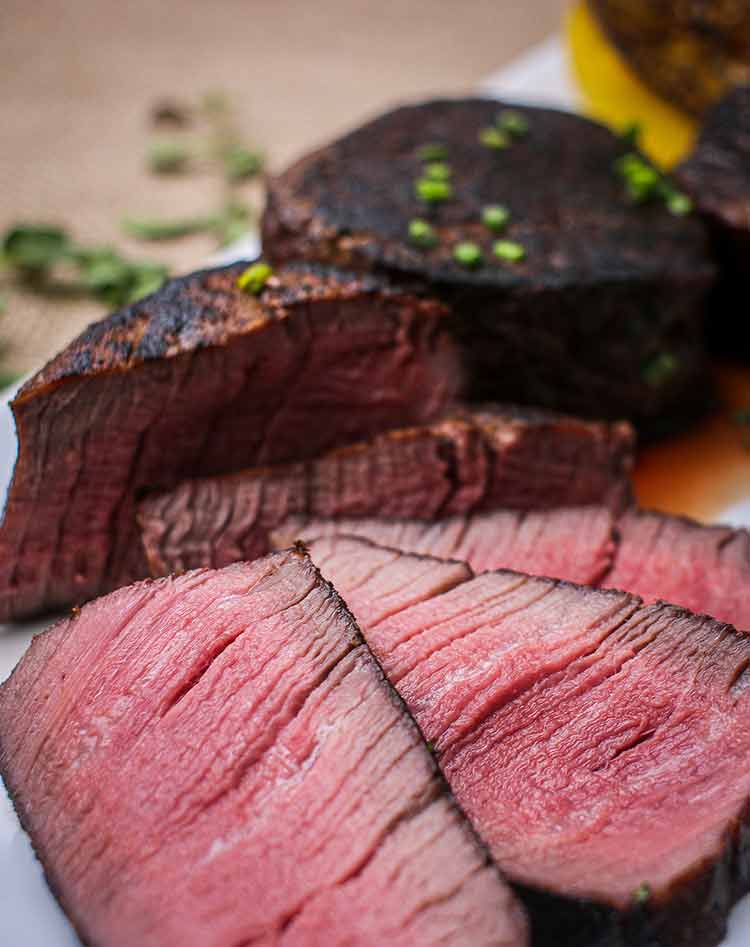
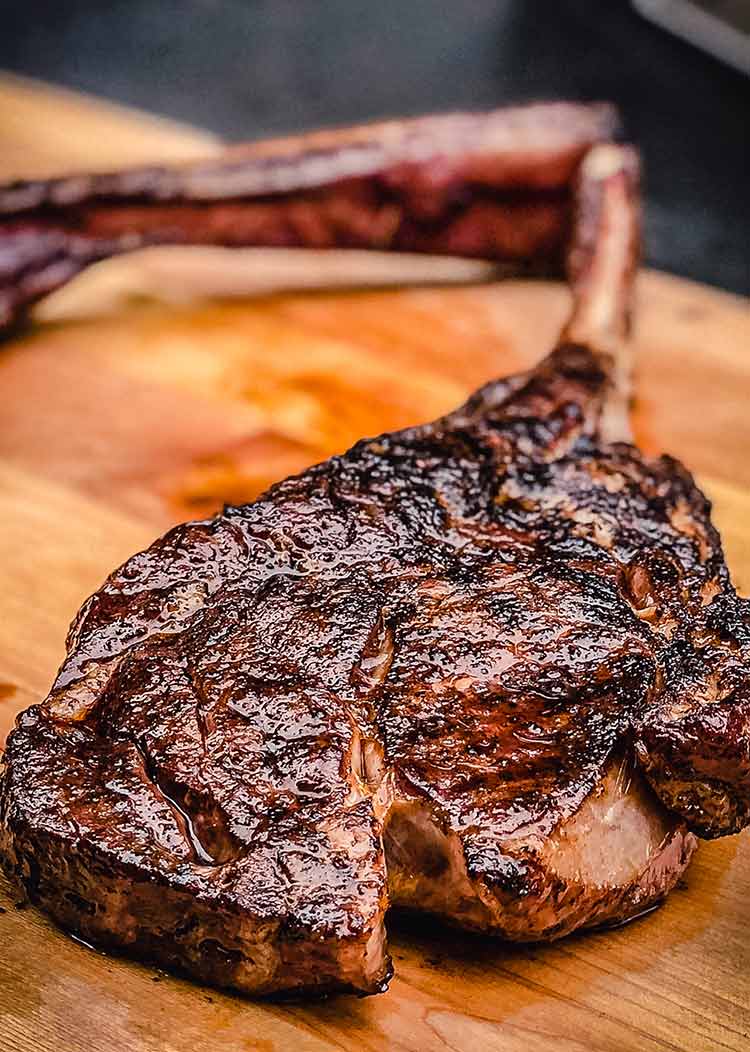
Step 8: Place the cooked steak directly onto the scorching hot skillet, flipping every 30 seconds for about 5 minutes total to develop that dark crust.
Step 9: Remove the steak from the cast iron pan and top with room-temperature compound butter. Slice and serve immediately.
You probably won’t have leftovers, but if you do, they make great philly cheesesteak sliders.
Ingredients
- 1 Tomahawk Ribeye
- 2 tbsp compound herb butter
- 1-2 sprigs fresh rosemary
- Salt and pepper to taste (or your favorite steak rub)
Instructions
- Remove your steak or steaks from the refrigerator and allow it to warm up slightly to room temperature for about an hour. Starting with a steak that is closer to room temperature helps with the even doneness we’re striving for. While the steak is warming up, cut just a sliver of the fat from around the edge of the steak and place it back in the refrigerator. We’ll use that later.
- Season liberally with kosher salt and pepper, or your favorite steak rub. Insert a reliable leave-in thermometer into thickest portion of the steak.
- Place the cast iron pan in the oven and preheat the oven to 225° F.
- Place steak on a cooling rack, and place rack in a baking sheet. I cover the baking sheet with foil just to cut down on the cleanup later.
- Place steak in oven until it reaches an internal temperature of 125° F; about 45 minutes depending on the size of the steak. (This is the timing for medium rare; cook to your desired temperature.)
- Remove steak from oven and let rest while continually monitoring the internal temperature on the leave-in thermometer. Temperature should peak at around 129–130°F (usually about 7–8 minutes).
- While steak is resting, place the preheated cast iron pan over medium-high heat on stovetop. Then, place that sliver of fat we removed earlier into pan and allow it to render down. This is what we are going to sear the steak in. Once the steak's internal temperature has peaked and starts decreasing, add a sprig of rosemary to the rendered beef fat, and crank the heat under the cast iron pan to max for about a minute.
- Place the cooked steak directly onto the scorching hot skillet, flipping every 30 seconds for about 5 minutes total to develop that dark crust.
- Remove steak from the cast iron pan and top with compound butter. Slice and serve immediately.
Fantastic restaurant quality steak. Perfect as the recipe reads. Will make this again.
Thanks so much Kim, I’m glad you tried it.
-M
I like mine done about 120-125. Would you say take it off around 110 for that? Also I sometimes get the problem of having a huge outer ring of too done meat. Is this because of the sear being too hot/long or the oven temp being too high (I do 250 and the ambient probe reads 225-230), or is it not letting the steak get to room temp. A 4″ Tomahawk got to 60 in about 90 minutes.
Hey Dave, thanks for the question. When you experience the outer portion of the steak being overdone, (that sort of gray ring) it is due to one of two things. Either the low temp cooking in the oven is taking place a temperature that’s too high, or the sear is happening at a temperature that’s too low, requiring it to be seared for a longer period of time in order to achieve the crust desired. If you’re sure the oven is gently cooking the steak at 225°F you can eliminate that piece of the puzzle.
Next, are you using a reliable leave in meat thermometer to indicate internal temperature of the steak? I always recommend the ThermoWorks thermo. If so, yes – I recommend removing the steak at an internal temperature of ~110°F if you’re looking for a finished temp of 120°F. In this case, I suspect the searing isn’t being done in a hot enough skillet. With the temperature of the cast iron hot enough for searing, it should take less than 5 minutes (flipping every 30 seconds) to sear the steak properly and avoid the gray ring around the outside of the steak. Remember, when searing the idea is to subject the meat to as high of temperature as possible, for as little time as possible to prevent temperature migration into the meat, causing it to cook further around the outside and becoming overdone.
One question, you mentioned a 4″ tomahawk, are you saying the steak is 4″ thick? I hope this is helpful, if not shoot me an email and we can even set up a call to help you out or answer any other questions.
-M
Wowza! Followed directions to a T. Turned out spectacular! I wish I could upload a pic!
I’m so glad, thanks for the feedback Julie!
-M
Absolutely the best piece of meat to come out of my kitchen ever! Perfect perfect and oh wait perfect! Thanks so much. I tried this for the first time about a month ago, and today I got 6 tomahawks lol! Yes I froze 5 of them but tonight we are doing this recipe again, spectacular. So easy! We did the searing on our bbq in the cast iron, less kitchen mess and turned out even better when we did this! Thanks for sharing this with us, my new go to method for tomahawks!!! Fantastic nom nom nom nom
Thank you Susan, so many benefits to using cast iron on the grill. No smell in the house, and no cleaning the stove top! 🙂
-M
At just under 800 grams my tomahawk was a little smaller than average yet it has been in the oven now for exactly 90 minutes and the internal temp is still only 130f. I am seriously questioning this recipe
Hi Craig – Thanks for checking out the blog, I appreciate the support. If your steak is at 130°F internal temperature while in the oven, and you haven’t yet seared it, it’s going to be well done plus by the time you eat it. This recipe and technique is written for a medium rare as stated in Step 5. I hope you’ll give some other recipes a try as well.
-M
I had the same issue, mine took longer with 4 inch tomahawks. I did let my steaks rest for 2 hours prior to putting in the oven. Another thing i did was add an over thermometer to check temp, as the built in one can sometimes not be as accurate.
I waited till temp was 125, rested for about 10 minutes went to 134. Seared, and came out best steak I’ve ever cooked this way.
This is first time i tried reverse sear and first time doing tomahawks in general. Followed the recipe exactly as written. I didn’t have a cast iron big enough to do the searing, so i used a stainless steel one, and a non stick Made in big pan that i had. The only thing that went wrong, was the rosemary and i did add garlic too, burned instantly. So i didn’t get a chance to do my normal basting with it. But the sear actually came out pretty good, and temp was spot on. I didn’t make the compound butter, but just added a bit unsalted. Steak was so good! I’ll invest in a bigger cast iron pan! I think salting my steaks the day before and letting that work its way helped.
Thanks for the tips and recipe!
Really glad you enjoyed this Vic, definitely keep an eye on the cast iron sales around the holidays and invest in one you’ll have for the rest of your life. Thanks for checking this out!
-M
I stumbled upon this recipe, and it is now the only way I will make tomahawk steaks! It was so delicious. The absolute best steak I have ever had. I did dry brine the steak overnight for even a better crust.
Thank you!
So glad you loves it Zandra! Can never go wring with an overnight dry brine!
-M
I’ve heard of reverse sear for a while now but never looked into the process. I’m so glad I used Matt’s techniques (chef’s kiss using a sliver of fat for the searing) and now I will forever use this method to cooks steaks at home. Thanks, Matt!
Thank you for the kind words Michelle, so easy right?
-M